- How to get your Crape Myrtles bloom again
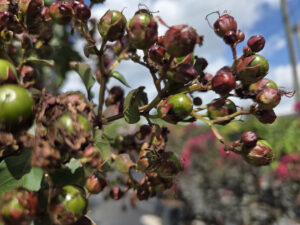
As a proud Crape Myrtle owner, part of your gratification is its vibrant, long-lasting blooms in spring and summer.However, it is possible to extend its blooming season with a light pruning. If your Crape Myrtle has about 15-20% blooming branches left while the older blooms have produced berries, it’s time to cut the berries off and give the tree a trim to encourage new growth. Crape Myrtles grow fast, so don’t worry about “hurting” it.
The following are suggestions for how much to trim to encourage new growth and blooming based on tree size:
Crape Myrtle Height:
2-4’: trim berries off only
4-8’: trim 1-2″ off
10-14’: trim 4″ off
14-18’: trim 6-8″ off
We also recommend following up with fertilization after trimming to intensify the next round of gorgeous flowers! - Lead Them to Water: June is National Pollinator Month
There is always something blooming in our nursery, and where there are blooms, there are all kinds of winged and non-winged creatures looking for sustenance. However, planting pollinator-friendly plants is not the only way to be kind to them.
One of the most important things you can do for them is to provide a water source, which is particularly important during periods of drought, and it’s something you can easily incorporate into your garden or landscape.
Most gardeners get super excited about bees, butterflies, and hummingbirds, but not so much about bats, moths, flies, and beetles. Luckily, whatever you do to attract one of those pollinators will actually support them all.
While hummingbirds and bats generally get their water from the nectar they consume (which makes your hummingbird feeder a very useful feature because hummingbirds like them just as much as they like the native plants that provide them with nectar), butterflies and honeybees do rely on water for several reasons.
In particular, honeybees sip water to take it back to their hive, where they will stand at the front entrance, release a droplet of water they brought in, and fan their wings. The process works like a swamp cooler, and this way of air conditioning is very unique to honeybees.
Other pollinators, especially butterflies, look for a more naturalized water feature in the garden, like a pond with a little waterfall or another established water feature, because they seek out water with mineral and salt content to fill their nutritional needs.
For this reason, providing safe and accessible water sources is an important task, which requires thought. A birdbath, for example, is not only a source of water that is poorly suited for bees and butterflies, but it is also dangerous because many pollinators can’t swim; attempting to land on water in the birdbath or a swimming pool without a landing pad or shallow, gradual, beach-like entry point causes them to drown en masse.
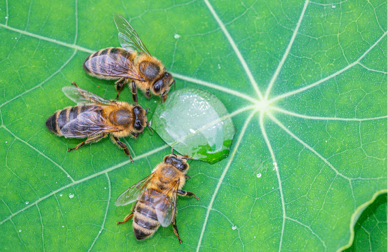
For a small insect, even a drop of morning dew on the leaves in your garden can be sufficient. And if there’s the slightest drip in your garden faucet, you will sometimes see a bee land by it and then drink from that. Similarly, you may find butterflies and bees landing on wet and muddy soil to hydrate and take in some nutrients in the process.The good news is that creating a safe and accessible water source for pollinators is easy.
Put some rocks or gravel in your existing birdbath, which will enable bees to land on a firm surface and then bend over to drink the water. However, if you’re hoping that your birdbath will serve a dual purpose and attract both pollinators and birds to your yard, think again. You should really have an alternative for the bees and the butterflies because one size does not fit all. So, simply put out a bowl with some stones or aquarium gravel at the edges of your garden, then fill it with a little bit of water.
Another (decidedly more creative and prettier) option is to place in your garden a drinking ball with a grooved surface designed specifically for bees and butterflies.
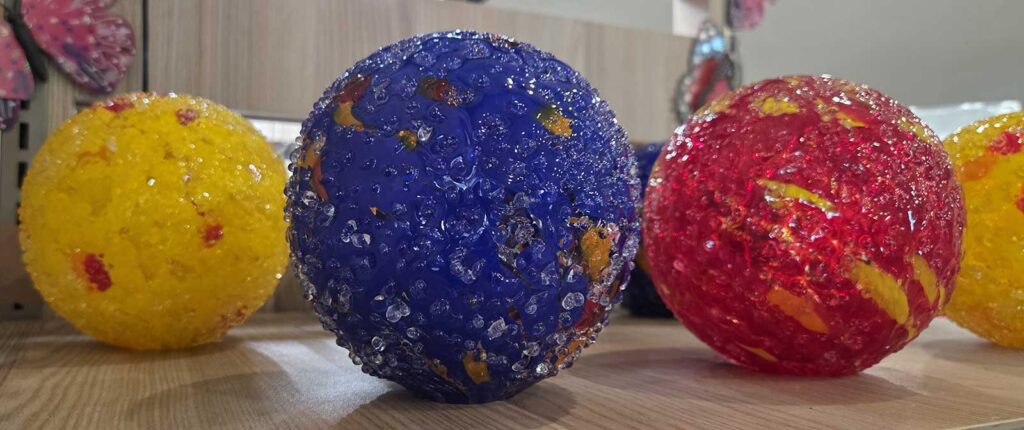
Please call us to see if we have any in stock.
- Gardenias in Central Florida: Varieties, Planting, Care
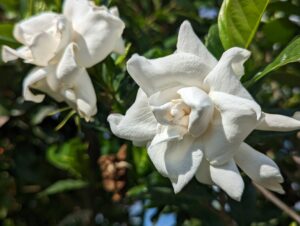
Miami Supreme Gardenia
Gardenias not only look stunning but also emit an enchanting aroma that will transport you to a floral paradise. If you’re a gardening enthusiast in sunny Florida, rejoice! Gardenias can thrive in our tropical climate and bring a touch of elegance to your garden.
Varieties that thrive in Central Florida:
Variety Growth Habit Mature Size Bloom Size Bloom Season Bloom Characteristics Hardiness Zones Miami Supreme Upright 3-4 ft Large Spring Double, Fragrant 9-11 Vetchii Compact, dense 2-3 ft Medium Spring Double, Fragrant 9-11 Aimee Rounded 3-4 ft Large Spring Double, Fragrant 9-11 Buttons Compact, low 1-2 ft Small Spring Single, Fragrant 9-11 Radicans Spreading 1-2 ft Small Spring Single, Fragrant 9-11 Frostproof Upright 4-5 ft Medium Spring Single, Fragrant 8-11 August Beauty Upright 4-6 ft Large Spring-Fall Double, Fragrant 9-11 Belmont Upright 3-4 ft Medium Spring Double, Fragrant 9-11 Snow Girl Compact, low 1-2 ft Small Spring Single, Fragrant 9-11 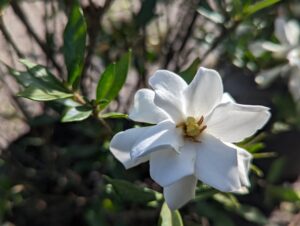
Frostproof Gardenias
Groovy Gardenia Varieties:
- Miami Supreme: Stand tall! These beauties reach 3-4 feet high and boast large, double blooms with an intoxicating scent. Talk about making a grand entrance in your garden!
- Vetchii: Don’t be fooled by their compact size! These dense darlings, standing 2-3 feet tall, offer medium-sized, double blooms that emit a delightful fragrance. Perfect for cozy garden corners.
- Aimee: Picture perfect! With their rounded shape and large, double blooms, Aimee gardenias steal the spotlight at 3-4 feet tall. Pluck a few for indoor arrangements and let the compliments pour in!
- Buttons: Cute and compact, these low-growing gardenias (1-2 feet) show off small, single blooms that pack a fragrant punch. Ideal for rock gardens or adding a touch of charm to the front yard.
- Radicans: Let them roam wild! Radicans gardenias spread out gracefully, reaching 1-2 feet in height. Their small, single blooms with a captivating fragrance make them the trailblazers of your garden.
- Frostproof: Frost who? These upright performers reach 4-6 feet high, showcasing large, single blooms that smell divine. Be prepared to have neighbors lining up for a whiff!
- August Beauty: Get ready for a season-long affair! These tall and upright gardenias (4-6 feet) mesmerize with their large, double blooms that grace your garden from spring to fall. A true beauty indeed!
- Belmont: Aim high! Standing tall at 3-4 feet, Belmont gardenias flaunt medium-sized, double blooms that exude elegance. The perfect companions for high tea in your garden oasis.
- Snow Girl: Petite and lovely! These compact, low-growing gardenias (1-2 feet) charm with their small, single blooms and delightful fragrance. They’re like a snowflake, but better, because they don’t melt!
Let’s Have Some Bloomin’ Fun:
- Find a spot with partial shade to protect your gardenias from the scorching afternoon sun. They like a little shade to strut their stuff.
- Prepare the soil by mixing in some organic matter. Think of it as pampering the soil, giving it a spa treatment before your gardenias move in.
- Water your gardenias regularly, especially during dry spells. They love a good drink, but don’t drown them—just keep the soil moist, not waterlogged.
- Treat your gardenias to a feast with a slow-release fertilizer for acid-loving plants. Follow the instructions, because too much of a good thing can be overwhelming.
- Time for a little snip-snip! After the blooming season, give your gardenias a gentle pruning to shape them up and remove any dead or damaged branches. They’ll appreciate the trim!
- Keep an eye out for pesky pests like aphids, whiteflies, and scale insects. Show those critters who’s boss by promptly treating any infestations with organic or chemical solutions.
- Jack Frost is no friend of gardenias. When winter chills arrive, cover your gardenias with a cozy frost cloth or bring potted ones indoors for a winter slumber.
Adding Vertical Elegance to Your Garden:
Oh, and let’s not forget about the majestic beauty of gardenia trees! If you’re looking to make a bold statement in your garden, consider planting a gardenia tree. These enchanting giants can reach heights of 10 to 15 feet, creating a stunning focal point with their lush foliage and abundant blooms.
Gardenia trees offer all the fragrance and elegance of their shrub counterparts but with a vertical twist. Their branches gracefully spread out, showcasing a plethora of exquisite blooms. Imagine strolling through your garden, surrounded by the sweet scent of gardenia blossoms as they dance in the breeze.
When it comes to choosing a gardenia tree, popular varieties like “Veitchii” and “Miami Supreme” make excellent options. Just like their shrub counterparts, these gardenia trees dazzle with their double blooms and intoxicating fragrance. Plant them in well-drained soil, provide them with partial shade, and watch them grow into showstoppers that will leave your neighbors in awe.
Remember, gardenia trees require similar care to gardenia shrubs, including regular watering, feeding, and protection from frost. Prune them lightly after blooming to maintain their shape and encourage new growth.
Let Your Senses Bloom and Your Garden Shine!
Congratulations, gardenia enthusiast! You’re now equipped with the knowledge and enthusiasm to grow these fragrant wonders. Whether you prefer the charm of gardenia shrubs or the grandeur of gardenia trees, these fragrant beauties will add a touch of magic to your garden. So, go ahead and unleash the splendor of gardenias in all their forms, and let their heavenly fragrance and captivating blooms fill your outdoor oasis with joy and wonder. Head over to Canterbury Farms Nursery & Garden Center, where the gardenia party never stops! Happy gardening, my scented friends!
Note: The information in the chart is for general guidance only and may vary based on specific growing conditions. Not all varieties are available at all times. Contact us to inquire about current stock.
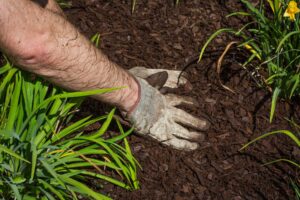
- Mulching keeps you (and your plants) covered
Mulching is an essential aspect of gardening in Florida. It retains moisture, suppresses weeds, regulates soil temperature, and improves soil health.
Mulching is one of the principles of Florida-Friendly Landscaping, a set of guidelines designed by the University of Florida IFAS Extension to promote sustainable landscaping practices in Florida. By using mulch, you can reduce water consumption, limit the use of chemical fertilizers, and minimize yard waste. Florida-Friendly Landscaping emphasizes the use of mulch made from natural, locally-sourced materials, which helps support local businesses and reduces the carbon footprint associated with transportation.
(Learn more about the Nine Principles of Florida-Friendly Landscaping)
Here are some mulching tips to help you get started:
- Choose the right mulch: There are many types of mulch to choose from, such as wood chips, pine straw, and shredded leaves. Consider the purpose of your mulch, the plants you’re mulching, and the aesthetics you want to achieve.
- Apply the right amount: A good rule of thumb is to apply 2-3 inches of mulch around your plants. Too little mulch won’t be effective, while too much can suffocate your plants and promote fungal growth.
-

One of the most common examples of incorrect mulching is “volcano mulching,” in which excessive amounts of mulch materials are piled at the base of plants, touching trunks or stems. Placing mulch too close to the stem or trunk of your plant can lead to improper root growth, decay, and infestation.
Don’t pile mulch against plant stems: Mulch piled against the stems of plants can trap moisture and promote rot. Keep a few inches of space between the mulch and the stems of your plants.
- Mulch regularly: Mulch breaks down over time, so you’ll need to add more to maintain the desired depth. Aim to mulch at least once a year or as needed.
- Use mulch as a soil amendment: As mulch breaks down, it adds organic matter to the soil, improving soil health and fertility. When adding mulch, consider using it as a soil amendment instead of just a top dressing.
- Consider the time of year: In Florida, the best time to mulch is in the spring or fall when temperatures are moderate. Avoid mulching in the summer when the heat can trap too much moisture around plant roots.
(Pro tip: Be careful if using some of the free recycled mulches that may be available from tree services or municipal debris collection sites. These mulches are not treated or certified in any way and can often contain debris that has many seeds for weeds just waiting to sprout in your beautiful plant beds.)
While organic materials, such as wood chips and pine straw, are popular choices for mulching, inorganic materials (rock) can provide an alternative, if desired. Here are some pros and cons to consider before choosing an alternative mulch:
Pros:
- Long-lasting: Stone can last for years without needing replacement.
- Aesthetically pleasing: Stone mulch can give a garden a clean, modern look.
- Does not attract pests: unlike organic mulches, stone mulch does not appeal to termites or rodents.
- Provides good drainage: Both stone and rubber mulch allow water to easily flow through them, preventing waterlogging and root rot.
Cons:
- Expense: Stone is much more expensive than organic mulch.
- Can retain heat: Stone absorbs and retains heat, potentially overheating plant roots and damaging plants during hot weather.
- Does not improve soil health: Unlike organic mulches, stone does not break down and improve soil health over time.
-
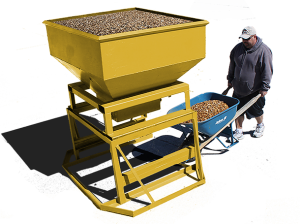
The Drop N Rock was designed to make working with rock a little easier.
Weight: Stone is significantly heavier than natural mulch, which can present difficulties for those with physical limitations. (Pro tip: If you’re looking to DIY stone in your plant beds, consider purchasing from Rock Solid Stone Center in the Tampa Bay area. They offer the rental of a device called the “Drop N Rock” hopper, which allows you to move and install aggregate without shoveling and without the mess.)
Ultimately, the choice of mulch comes down to personal preference, the needs of your garden, and your budget. Consider the pros and cons of each option before making a decision, and don’t hesitate to ask our garden center experts for advice.
- March in Central Florida garden: to-do list
WHAT TO DO
Azaleas: Prune azaleas just after they finish blooming to shape or produce a fuller plant.
Shrubs and trees: Prune when new growth begins after the end of the dormant season. To guard next season’s blooms, begin pruning after the last flowers fade but before the new buds set.
Palms and shrubs: Fertilize palms, azaleas, camellias, and other ornamental shrubs if needed.
Irrigation: Spring is a great time to re-check your sprinkler systems for efficient water use.
WHAT TO PLANT
Annuals: Replace declining winter annuals with varieties such as angelonia, gazania, and salvia that will provide color now and into the summer months.
Herbs: In addition to their culinary value, many herbs are ornamental and attract butterflies to the garden.
Vegetables: Warm-season crops, such as beans, peppers, squash, and others can be planted now.
- How to tell if your palm or plant might not recover after a freeze.
“My poor palm tree is all brown, and it looks so sad. Is it dead?”
We hear this question a lot, and our answer applies to both palms and other cold-sensitive trees or shrubs: “It depends.” Here are key points:
 Important! Do not cut off any damaged branches until you’re reasonably sure that we’re done with cold spells for the season.
 Patience is key. Wait about two weeks after damage occurs before testing or pruning. Some tissue may still appear green but is no longer viable. It takes time for damaged tissue to fully decay and change color, so allowing that process to happen helps ensure you’re cutting to truly healthy growth.
After two (or more) weeks, perform a scratch test to see how your palm or plant is doing. Here is what you need to do:
 Lightly scratch the outer bark and check the color underneath. Always work from the tip of the branch downward until you find healthy green wood.
If you don’t find green tissue,
- check lower on the stem or near the base, then
- scratch near the root flare.
- If stems are fully brown and brittle to the base, you might need to replace it.
Your next step depends on what you’re seeing.
If the plant or palm is still alive, you’ll want to prune it.
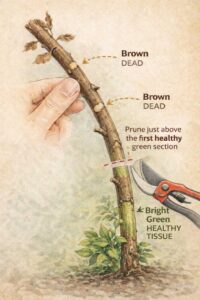
The key principle is simple: green tissue is a healthy tissue. That’s where you will want to make your cuts. Pruning back to living wood allows the plant to flush out with strong new growth as temperatures warm.
Once you locate living tissue, make a clean cut slightly above that area. Remove all brown, brittle growth and allow the plant to push new growth from the remaining healthy stem.
When in doubt, remember: Cut back to green — that’s where recovery begins.
- My tree does not look so good. How can I tell if it is dead?
Healthy tree
Dead tree
Distressed tree
An oldie, but goody as we get asked this one a lot.
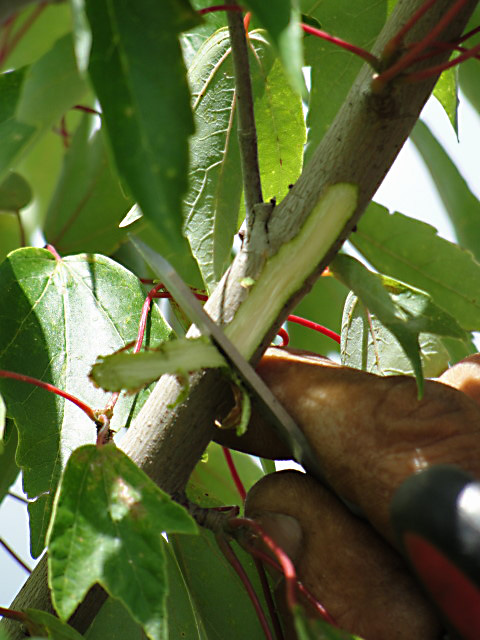
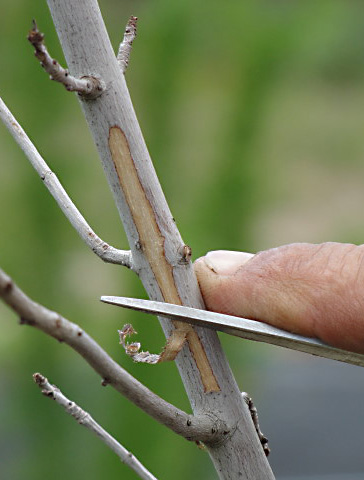
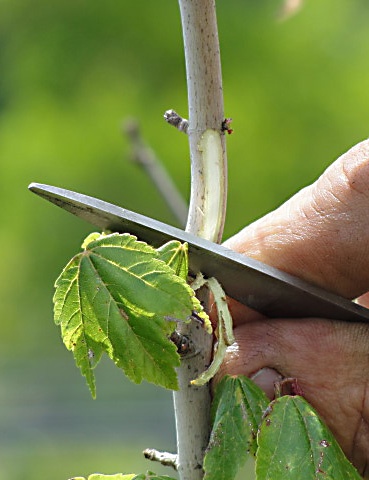
Once winter has passed, in the spring your dormant (lose/drop leaves in winter) trees will begin to flush and promote more leaves and foliage. If you do not see this transition taking place by late spring, perform the following test (we call it a scratch test):
Take a pair of scissors, a pocket knife, or a strong thumbnail and scrape on a branch of the tree to see the inside coloring.
Once scraped, one of the following 3 scenarios will occur.
1. The branch insides are a vibrant yellow and green.
Result: Congratulations, you have a happy and healthy tree.
2. The branch insides are less vibrant yellow with a little green.
Result: Your tree is showing signs of distress. Our best advice in a situation like this would be to cut back all the dead branches back to where the green foliage is and start giving it more water. A tree in distress usually comes from a lack of water or a deep freeze.
3. The branch insides are light brown/beige in color with no signs of green color and look dry.
Unfortunately, this reveals signs of a dead tree.
Call us if you have questions or need advice on what kind of replacement tree to pick. - How to effectively protect your plants and palms from freeze
When covering landscaping beds, simply lay your cloth or blankets on top of your cold sensitive plants and tack down with stakes or large sod staples.

Remove once freeze warnings are lifted.
When covering cold sensitive palms, be sure to wrap the heads and fronds of the palms with cloth or blankets. Secure the cloth by tying a string around it, or you can also use clothes pins or larger clips. It is imperative that the heads of the palms are covered thoroughly, as this is where the heart of the palm is and the heart is the lifeline of the palm.
You should also work yourself down the trunk all the way to the ground as the ground projects heat to the palm.
Again, covering as much of the entire palm is crucial when it comes to protecting your palms from a freeze.
Once freeze warnings have ceased, simply unwrap, fold, and store away for next time. Keep in mind, these cloths are reusable for many, many years with good care.
- Plants and Palms that need to be protected from freeze
We specialize in growing Florida-friendly, drought-tolerant plants that weather freezing temperatures well.
However, we also sell some popular tropical/seasonal items imported from Miami/Homestead that will require extra care when temperatures falls below freezing (also, read article on how to properly protect your plants from freezing here). They are:
- Adonidia Palm aka Christmas Palm
- Allamanda
- Arboricola
- Areca Palm
- Bird of Paradise (Orange/White)
- Black Magic
- Blue Daze (If damaged by freeze, cut back & it will grow back.)
- Bougainvillea
- Cardboard Palm
- Cassia
- Copperleaf
- Crotons (Mammy & Petras)
- Dipladenia
- Foxtail Palm
- Gardenia
- Ginger
- Hibiscus (If damaged by freeze, cut back & it will grow back.)
- Ixora (Maui Red)
- Jasmine (Carolina) (If damaged by freeze, cut back & it will grow back.)
- Jasmine (Star) (If damaged by freeze, cut back & it will grow back.)
- Lady Palm
- Lantana (purple, white & yellow) (If damaged by freeze, cut back & it will grow back.)
- Mandevilla
- Plumbago (If damaged by freeze, cut back & it will grow back.)
- Pony Tail Palm
- Queen Palm (younger, smaller ones)
- Red Sister
- Rhapis (Lady) Palm
- Robellini Palm (younger, smaller ones)
- Ruella (Mexican Petunia) (If damaged by freeze, cut back & it will grow back.)
- Split Leaf
- Prepare for fall with this gardening to-do list for September
Here’s a landscape and garden to-do list for the month of September:
WHAT TO PLANT
Annuals/Bedding plants: If your summer beds need refreshing, try ageratum, coleus, celosia, zinnia, and wax begonia for color into fall.
Herbs: You can plant herbs that tolerate the warm temperatures of early fall, such as Mexican tarragon, mint, rosemary, and basil.
Vegetables: It is hot, but numerous cool-season (as well as warm-season) crops can be planted.
- Easily transplant: arugula, beets, broccoli, Brussels sprouts, cabbage, cauliflower, Chinese cabbage, collards, eggplant, endive, kale, lettuce, peppers, strawberry, sugarcane, strawberry, Swiss chard, tomatoes, and tropical spinaches.
- Transplant with care: celery, mustard, pineapple, and spinach.
- Use seeds: beans (bush, lima, pole), carrots, cucumbers, onions (bunching), radish, squashes, and turnips.
WHAT TO DO
Lawn problems: Continue to monitor the lawn for signs of insect damage. Fall armyworms, chinch bugs, mole crickets, and sod webworms are still active this month.
Irrigation: Check that your irrigation systems are providing good coverage and operating properly before the summer rains taper off.
Citrus: Fertilize your citrus trees with a balanced fertilizer either this month or in October. If the weather has been rainy, do not use soluble nitrogen as rains will leach it from the soil too quickly.
Fertilizer Bans: Some municipalities in Florida prohibit the application of fertilizer to lawns and/or landscape plants during the summer rainy season (June–September). See if such an ordinance exists in your area.
Vegetable gardens: Prepare your fall vegetable garden if you didn’t already do it in August. Using transplants from your local garden center will get the garden off to a fast start, but seeds can provide a wider variety from which to choose.
Source: University of Florida IFAS Extension (https://edis.ifas.ufl.edu/)
Growing in the Tampa Bay area for over 30 years