
Show-stopping Camellias: A great choice for the dormant winter months

Photo of Camellia japonica 'Jacks'

Camellia japonica ‘Jacks’

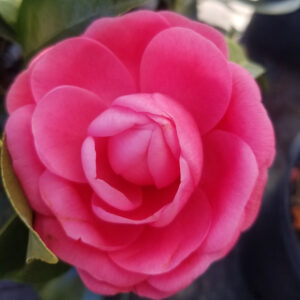
Camellias are a beautiful and popular flower that can add a touch of elegance to any garden. With the right care and attention, you can successfully grow camellias here in central Florida and enjoy their beauty during the seasons when most other flowering plants go dormant.

The first thing to consider when growing camellias in our area is the climate. Camellias are native to Asia and prefer a cooler, more temperate climate. This can be a challenge in our area, where the weather is often hot and humid. To help your camellias thrive, it’s important to choose a location that receives at least partial shade during the hottest part of the day. This can be provided by nearby trees or a trellis or pergola.

Another important factor to consider when growing camellias is soil. Camellias prefer well-drained, acidic soil with a pH of between 5.5 and 6.5. If your soil is too alkaline, you can amend it with peat moss or sulfur. It’s also important to make sure that your camellias are planted at the right depth and that they are not too close together.

Photo of Camellia japonica 'Christmas Beauty'

Camellia japonica ‘Christmas Beauty’

Once your camellias are planted, it’s important to keep them well-watered. They prefer consistently moist soil, but not waterlogged. Use a watering can or a hose with a gentle spray to water your camellias, and avoid using a sprinkler system.

Camellias also require regular fertilization to thrive. Use an acid-based fertilizer specifically formulated for camellias and azaleas. We recommend fertilizing your camellias in early spring, mid-summer, and again in the fall.

Photo of Camellia sasanqua 'Autumn Rocket'

Camellia sasanqua ‘Autumn Rocket’

Pest control is also important when growing camellias in central Florida. Camellias are susceptible to a number of pests, including scale insects, mealybugs, and spider mites. Keep an eye out for these pests and treat them promptly if you notice any signs of infestation.

Pro tip: The best time to prune Camellias is right after they are done blooming.  The plants will set the next season’s flower buds soon after the old flowers have expired.  So if you wait too long to prune, you will likely sacrifice some of your blooms for the following season.

Camellias come in a wide variety of colors and sizes, making them a versatile addition to any garden. Some of the popular varieties that we typically carry at Canterbury Farms:

  • Japonica: This is the most common variety of camellia and is known for its large, showy blooms that can be red, pink, or white. Japonicas typically bloom in the winter and early spring.
  • Sasanqua: These camellias bloom a bit earlier than japonicas, usually in the fall. They have smaller flowers than japonicas, but they are still quite showy. Sasanquas are known for their tolerance to heat and humidity, making them a good choice for central Florida.
Photo of Camellia flower bud

Camellia flower bud

It’s important to note that camellias can take several years to reach maturity and begin blooming, so be patient and enjoy the journey of growing them. It’s also worth noting that the blooming time can vary depending on the variety, location and the weather conditions.  

When choosing a camellia variety, take into consideration the size of the plant, the color and size of the blooms, and the blooming time. With the right variety and care, you can enjoy beautiful camellias in your garden for years to come.


By: Anna Stubbendick, FCHP

Lead Them to Water: June is National Pollinator Month

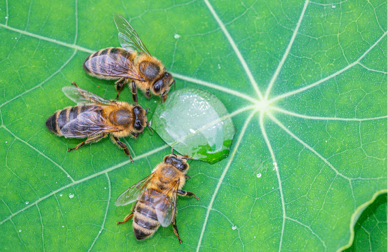
Lead them to water

Pollinators’ water supply can come from the most overlooked sources — from a pool of muddy rainwater to a drop in a spigot.

Photo © Vera Kuttelvaserova | Adobe Stock

Are you doing everything you can to support pollinators? One of the most important things you can do is offer a water source for them, and it’s something you can easily incorporate into your garden or landscape.

Most gardeners get absolutely the most excited about bees, butterflies and hummingbirds. And then people get a little less excited about bats, moths, flies and beetles, but they’re still important pollinators. And the great thing is that what you do to attract one of those pollinators actually supports them all. So, it’s really easy to help them all.

Hummingbirds and bats generally get their water from the nectar that they’re eating. Hummingbird feeders work really well — hummingbirds like them just as much as they like the native plants that provide them with nectar. So, hummingbirds and bats aren’t usually actively collecting water, but butterflies and honeybees do use water sources, and they use them for a variety of reasons.

In some cases, they take the water — and honeybees in particular will actually sip water, and then they’ll take it back to their hive. And they use it as a way to air condition the hive. So, they’ll stand at the front entrance of their hive, and they’ll (it sounds a little unattractive) spit up a little droplet of water and then they’ll fan their wings. And it basically works like a swamp cooler, so they can cool the hive that way. It’s very unique to honeybees.

Other pollinators, especially butterflies, look for a more naturalized water feature in the garden, like a pond with a little waterfall or another established water feature. We’re not talking birdbaths here, we’re talking an aquascape in your yard, like a meandering brook. Butterflies have an additional reason why they access water. And bees do this too, a little bit less so than butterflies, but they’re not looking for just clean waters. They’re actually looking for water with mineral and salt content, and that’s how they get that mineral and salt.

What’s important about water sources for pollinators like honeybees is that it has to be shallow and accessible. If you have a birdbath, for example, that’s not an ideal source of water for pollinators.

Bees can’t swim. They can’t access deeper sources of water safely. And if you are a homeowner that has a swimming pool or a birdbath, you may see that there’s a bee that has drowned in it is because they‘ve gone to try to take the water. They see the water, but they land on it and they can’t swim. For the type of water they need, they have to have a landing pad or kind of like a beach entry almost so that they can easily access that water.

If there’s the slightest drip in your garden faucet, you will sometimes see a bee land by it and then drink from that. And it‘s interesting because that mimics the behavior that they would have in just their natural habitat. Remember, they’re very, very small, so a water source for such a small organism can very often be just the morning dew on the leaves in your garden. And so, it is very common for bees to land on a leaf and then wick up a little drop of dew and that’s sufficient for them. Similarly, if they see that little drip coming out of your faucet, it‘s not uncommon to see a bee there.

Also, if you’re in the garden and you see wet soil or muddy water, you will also see butterflies and bees landing on that and drinking that muddy water because they’re after the nutrients in that. Let’s say you have an automatic sprinkler system — any of that exposed soil that does hold any water would actually become, again, a water source for butterflies and bees that are looking for that mineralized water.

How can you create a better water source for pollinators? Let’s say you have a birdbath. Put some rocks or gravel in it, so what you have is basically rocks with just a teeny bit of water in them so that you can see that the water is accessible from standing on one of those rocks or stones. That actually enables bees to land on a firm surface and then bend over and drink the water. If you’re trying to do a dual-purpose thing and you have a birdbath because you want birds to visit your water source, then you should actually have an alternative for the bees and the butterflies. So it’s not a one size fits all.

You do have to be creative, and you could also really just put out a bowl with some stones in it, even like aquarium gravel or something, and just have a bit of water in it. You could place them at the edges of your garden.

Article excerpt from Garden Center Magazine: June 6, 2022